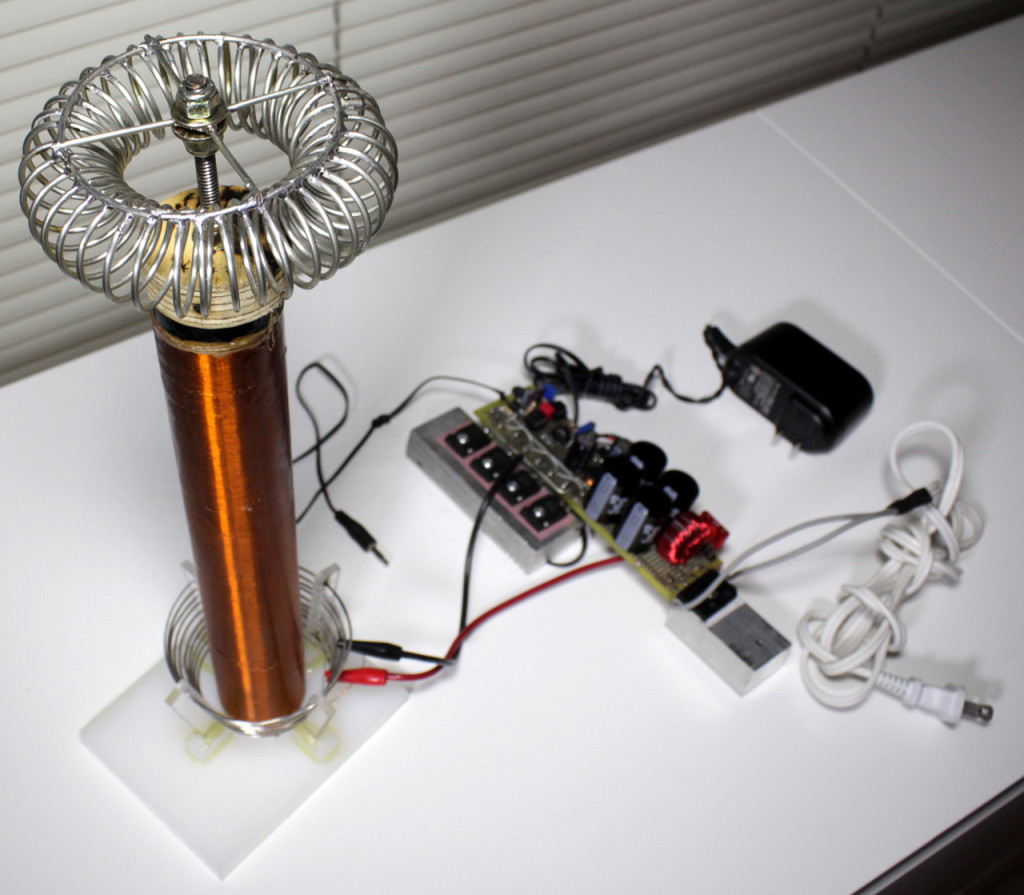
Tesla coil is not all about big and loud sparks:
DISCLAIMER: Also watch the following video. The circuit I made works and can output music, but it is very hard to tune and operate and can blow up easily too! Well I designed it so what do you expect?! It was the fast and dirty solution to make arcs sing. So if you like to take the challenge and make it, be very careful and patient. I should design a better circuit when I have a chance.
Tesla coils can be very quiet, or musical! Isn’t that strange? I always thought an arc makes a big sound. But the noisy ones only make big sound because they have low frequency components in them.
If you don’t care about the circuit and want some answers to what you saw in the video, skip all the way down to “Explaining Video Scenes”.
But before I elaborate on the circuit:
IMPORTANT SAFETY NOTES:
- Death is close by, try to prevent it!
- The radiation from this device can easily interfere with electronic devices, like pace makers. be very careful. All my touch screens were messed up being within a meter of the coil.
- This circuit can burn your skin badly (see picture at the end)
If you go back and read my Slayer Exciter article, there I explained that it is made of two windings, a primary with very few turns (around 10), and a secondary with many turns (around 1000 and above). But what you should know is that every inductor has a stray capacitive component and every capacitor has a stray inductive component.
For the secondary we intentionally increase the capacitance by adding the top load (the toroid on the top) which crease capacitance to the surrounding material.
This capacitance and secondary inductance create a sharp resonance frequency, which is very sharp! It basically means that only at that resonance frequency you will have a virtually infinite impedance, where all the energy can be radiated in the surrounding world.
That frequency is : Where f is frequency, L is the inductance and C is the capacitance.
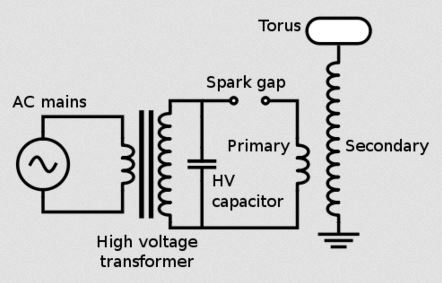
Now for the primary to be able to transfer the maximum power to the secondary and radiate it to the air, primary must also oscillate at the same exact frequency. In old time Tesla coils or spark gap type in general, a capacitance is also added on the primary side that is tuned to resonate with the primary inductance at the same exact frequency. You see the spark gap type driver below. It is still a very practical method when you need to make extremely large voltages.
In this type, the AC power input which is typically at 50Hz or 60Hz is amplified by a transformer to thousands of volts, which charges the high voltage (HV) capacitive. In every cycle of the AC, the capacitor voltage reaches very high voltage twice (negative and positive peaks),which is enough to break through the spark gap. The ionized air of the spark gap shorts air, and the HV capacitor to the primary of the Tesla coil. Now the capacitor is across the primary which will oscillate at the secondary resonance frequency, transferring all that energy and creates a super huge voltage on the output of secondary.
The super loud noise of this type is simply because you have a lightening every 100Hz or 120Hz.
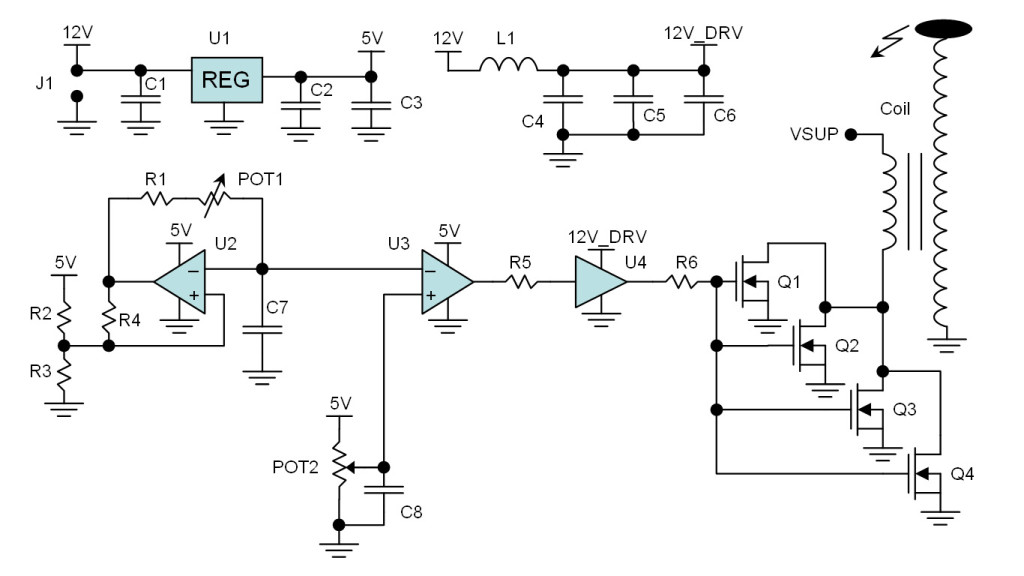
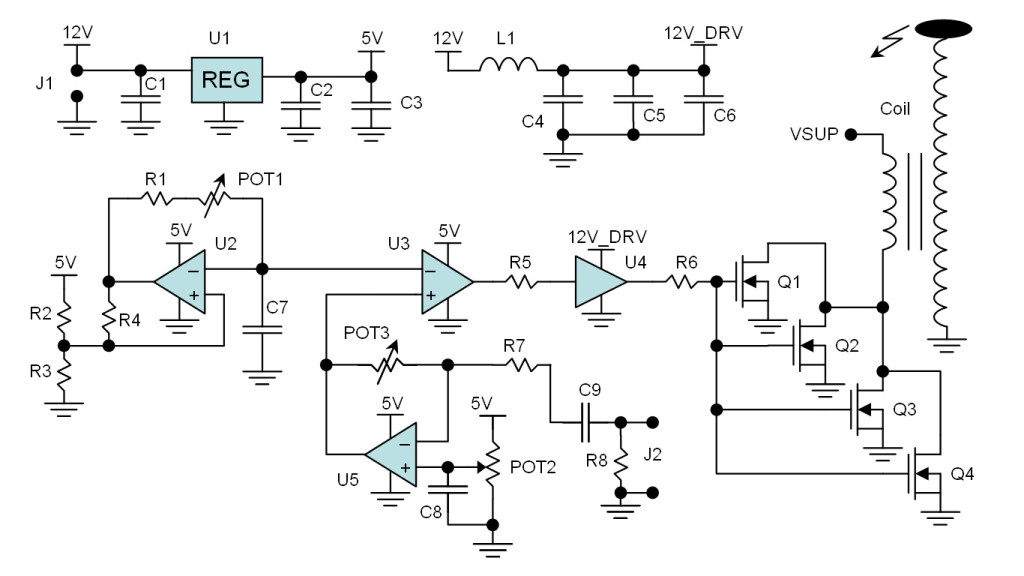
Having a solid state driver, like a slayer exciter or the one I explain below, you can run your circuit continuously at the resonance frequency using the fast circuitry that can oscillate at coil’s resonance frequency. Below is the schematic of the circuit I designed.
This circuit takes two input supplies, one at 12V at J1 connector, for which I used a 12V wall adapter, and VSUP, which I used my lab power supply at 32V for this video. You can also make the 12V from VSUP using an on board inverter. Originally I wanted to use my Full Bridge Rectifier and run VSUP at 170VDC rectifying the 120VAC. But that voltage was too big for my circuit and for the reasons I also explained in my Tesla Coil Half Way Report my MOSFETs (Q1 to Q4) blew up. I have plans to get around the issue but for now I discovered much beauty even at lower powers!
Here’s the Bill of Material for my circuit:
- R1 and R4: 1k Ohm
- R2 and R3: 10k Ohm
- R5: 100 Ohm
- R6: 2.7 Ohm
- POT1: 1-1623849-0 (multi-turn trim potentiometer)
- POT2: any single turn 100k potentiometer
- C1 and C4: 100uF, >16V
- C2 and C5: 10uF, >16V
- C3, C6 and C8: 100nF, >16V
- C7: 100pF, >10V
- L1: 10uH, >2A
- U1: MC78L05BP-AP or similar 7805 5V regulator
- U2 and U3: MCP6562-E/SN (dual comparator in one package)
- U4: MIC4452YN (MOSFET driver IC)
- Q1 to Q4: SCT2450KEC (Power MOSFET, 10A, 1200V)
This circuit is pretty simple. The 5V supply is created by U1 that feeds the low power comparator and OpAmp circuits.
The 12V supply is separately filtered through L1 and capacitor to supply U4, the MOSFET gate driver. The reason is that this driver draws large current spikes to quickly drive the MOSFET gate capacitors and the noise on the supply can easily effect the oscillator circuit, while we need an accurate frequency. It is also important to pay attention to the ground routing. Make sure the ground for the oscillator circuit is not supplied through power circuits (MOSFETs, gate driver).
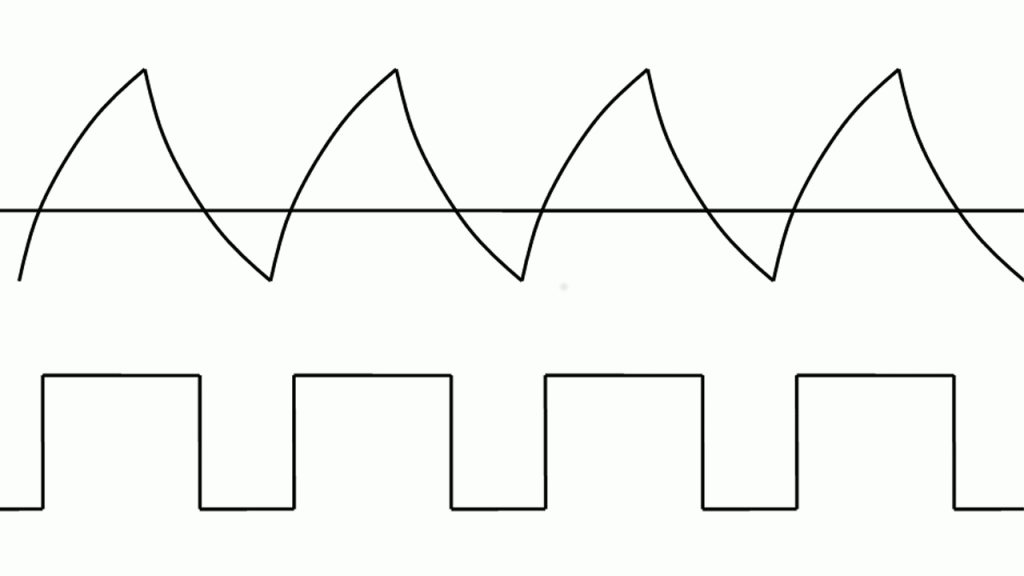
U2 circuit is an Schmitt trigger oscillator circuit. It’s frequency can be tuned somewhere between 500kHz to 1.5MHz using the POT1 potentiometer. My Tesla coil resonance frequency is around 1MHz. The output of the oscillator circuit where I’ve taken it from the capacitor C7 is a saw tooth waveform. I did it intentionally because I wanted to create a variable duty cycle PWM signal. So I compare the saw tooth signal with a DC voltage created by POT2. Depending on the level of the DC voltage, the duty cycle of the PWM can be tuned. Below is how the PWM changes by the DC level compared to saw tooth signal (click to make it move). This is similar circuit I used in Making an Electric Tooth Brush. Just that my PWM signal is inverted to what you see below. I didn’t want to remake this gif just for an inverted signal!
Now the PWM goes through U4 gate driver which will switch MOSFET transistors Q1 to Q4 on/off. I used 4 transistors so that they can share power between them and don’t get too hot. I also mounted them on a heat sink because they get quite hot.
Now when MOSFETs turn on, the primary is charged with current and when they turn off, the energy converts into a large voltage spike on primary that generates large voltages on secondary. The arcs are very quiet, like I mentioned and you seen in the video.
Important Functional Notes:
- Very important! Don’t use metal a screw driver to tune your circuit. It may burn your finger and it will mess up your frequency. Use a plastic or wooden, rather long screw driver. I carved my screw driver from a long stick.
- The arcs will not jump out directly from the toroid as it still doesn’t have mega volt levels. You need to simply place a rod or some metal with a sharp tip so arc can jump out of it.
- You need to accurately tune the frequency for the arcs to come out. But every coil has its own resonance frequency. To find what it is, make the simple Slayer Exciter circuit. When your coil works well with the exciter, probe the base of the transistor with a scope and measure the frequency and voila! you know the resonance frequency.
- The resonance frequency can greatly change based on the environment around the coil. For example if you bring your hand close, or place different objects around it, the stray capacitance will change, changing the resonance frequency. This circuit, unlike the Slayer Exciter, doesn’t have a feedback to automatically tune the change. So if you change something, re-tune the frequency to get biggest arc. For example in my video, for every scene I had to re-tune it based on what I was bringing close to the toroid. It will be close to the original frequency though, so turning POT1 back and forth a bit, you will find the peak.
- For maximum power, tune the PWM duty cycle to 50% to 60%. Above or below this duty cycle will not yield any more power.
- Before applying VSUP, turn the 12V supply on, make sure all your circuit works, tune the frequency to what the resonance is supposed to b. Then turn VSUP on at a lower level and tune your arcs a bit, then ramp it up to maximum (32V in my case). Then tune the frequency further (very slowly) to get the arcs going best.
- Don’t run the circuit for too long as the MOSFETs will get quite hot and can burn, killing R6 and U4 with them. A good heat sink is important.
- On that note, buy many spare parts!
- VSUP can be further increased. I have tried 45V also and my arcs get bigger. I have also tried 170VDC from my bridge rectifier with large arcs. But it is on the edge of destruction there. If you have an auto transformer, you can tune down the AC supply to your bridge to protect the FETs but yet get bigger arcs. The reason they break at higher voltages is that when the MOSFETs turn off, the primary voltage jumps high. If it goes above the 1200V rating of the FETs, they enter avalanche mode and get very hot and eventually break. Great heat sinking is key.
- The arcs may get noisier at higher power because they will start loading the supplies and VSUP wouldn’t be a nice and clean DC, creating noise at the output.
- POT2: something you should note that U4 has a strange behavior. When the input PWM duty cycle goes below some value around 10%, the output of U4 actually generates bigger PWM and can jump close to 100%. That is not good. So make sure you know what that level is on your potentiometer and not go below it. You can add a 15V series resistor between your POT and ground. That’s what I used and it ensures the DC voltage doesn’t go too low.
- One more important thing, make sure physical bottom side of both windings are connected to DC levels (primary bottom to VSUP, secondary bottom to ground or VSUP). If you do it another way, you may get weaker sparks.
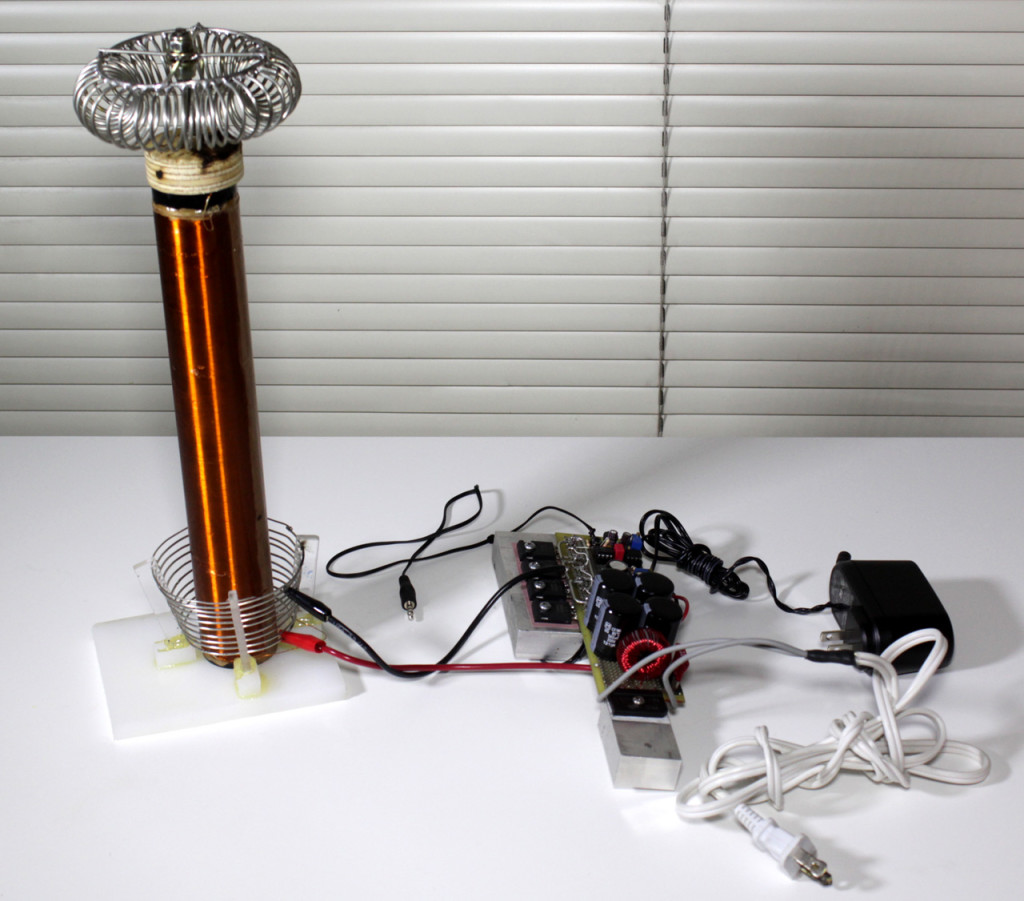
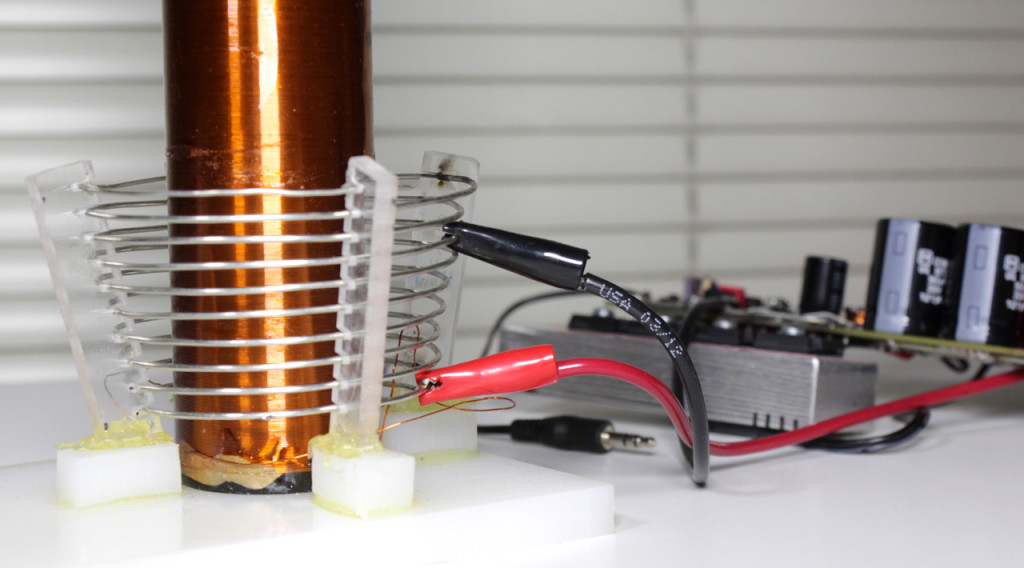
- I connected the primary to my circuit using alligator clips as shown in picture below. The red wire is VSUP and the black wire is coming from the MOSFETs. Moving the black wire can change the number of primary turns. You can increase the size of your arc by tuning the black wire location.
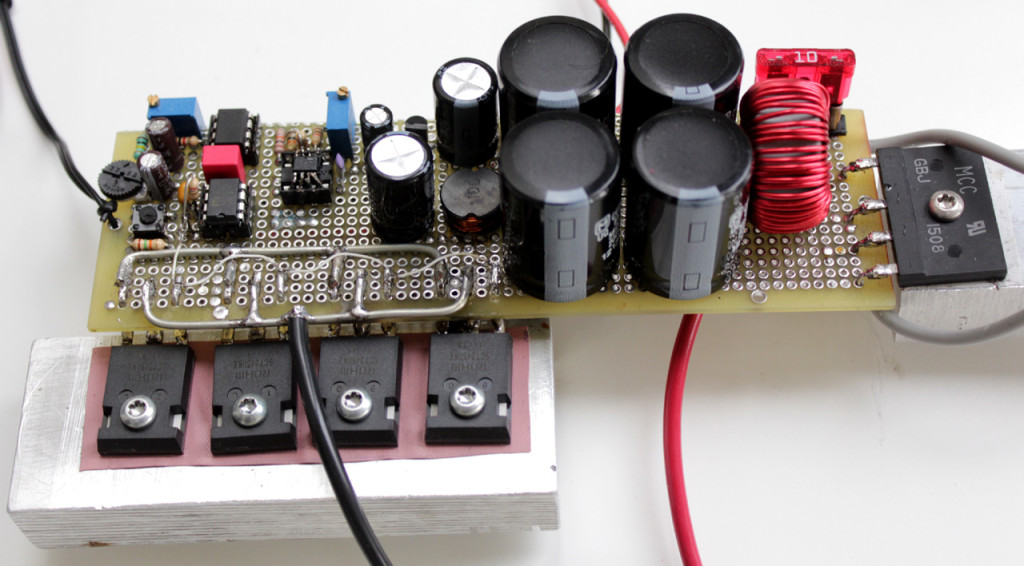
You might ask why I didn’t use a feedback like the slayer exciter circuit to auto tune the resonance frequency. It was because I wanted to make high quality audio, which was very simply done with this circuit. Having audio is also possible with the auto-tuned circuit, but you will get saturated sounds with that one, not a nice music like this one with such simple circuit, unless you want to get fancy with your driving circuit. Here’s a snapshot of the circuit:
Making the Most Dangerous Speaker
Now I moved POT2 and placed an OpAmp Circuit shown in picture below. J2 is an audio jack, or in my case I just cut a broken headphone cord and soldered it to my circuit. I could plug the jack to my cellphone or laptop.
U5 circuit basically amplifies the audio, with a gain tunable with POT3. POT2 still has the same effect as before. It tunes the average duty cycle while the audio input modulated the duty cycle with audio signals around the average PWM. The change in PWM creates a change in output power of arcs and so creates sound.
Here’s the Bill of Material for new components:
- U5: Any standard OpAmp with an output that can reach zero would work. I used LM358.
- POT3: Same at POT1, multi-turn potentiometer
- R7: 1k Ohm
- R8: 10k Ohm
- C9: 10uF >10V
Now this is some manly speaker! Why would anyone create sound using a diaphragm when you can use arcs instead?!
Explaining Video Scenes:
- Yes, the arcs are very quite like I explained. This is especially great because it means you can play music with it without too much background noise.
- When you bring a florescent light close, it turns on. The super high voltage excites the florescent material in the lamp like I explained in Slayer Exciter video.
- Using the incandescent light is pretty cool. You can see the plasma made in the lamp and the flow of electrons like dancing flames. The special form of plasma in the bulb is due to the gas in it. As you see in the video as soon as the glass melts and breaks under the extreme heat of the arcs, regular air gets inside and the arcs look the same as ones in the air.
- Of course the glass is non conductive. What you should remember is that there is no continuous one way flow of electrons. The arcs you see are electrons jumping back and forth at 1MHz frequency. This means that at that high of a voltage we just have a capacitor between the toroid and the light bulb contacts attached to my hand. The capacitor insulation is air and glass. In every 1MHz cycle, the electrons jump to the glass pushing the electrons inside the bulb away, and then the toroid sucks them back in leaving positive charge at the glass, which will pull the electrons into the bulb, and that’s the flow of electrons creating the plasma. There are no electrons passing the glass, of course until it breaks.
- My spinning wheel, it was beautiful! There’s a jet of electrons shooting from the ends, of course, but it is not the weight of electrons jumping out that turn the wheel, no siree! The mass of electrons is almost zero. And they are not jumping out anyways, they are jumping out and in at 1MHz frequency. So what is turning the wheel? It is the expansion of air due to the heat of arcs that pushes the rod away. The arcs are pretty hot. In fact when I bring my hand close to them, I can feel the heat rising from them.
- The arcs don’t zap like regular electricity. Yes, that surprises me too. It has something to do with the no noise nature of these arcs too. If arcs make noise, they are much more dangerous! Why? Two reasons: first, at such high frequencies like 1MHz, your nerves or muscles don’t react to the electricity, so you won’t shake or jump. But it is not really the reason why they are less dangerous. Second: they are less dangerous because of something called “Skin Effect”, which is not about human skin, but rather conductor surface (skin). Look it up. Basically as the frequency rises, electromagnetic fields are created in a conductor that push the flow of current to the surface of the conductor in a thinner skin, and less is passed through the central area of the conductor. That’s called skin effect. For 1MHz, the most of current can only penetrate around 60 micro-meter deep into a conductor. For a human, it means it will no go deep enough to effect vital organs like brain or heart and remains on the surface of body. The arcs that make noise have low frequency components in them in audible range. These frequencies can penetrate deeper in the body, shake muscles and be lethal.
- The arcs, jumping directly to the finger, burn the skin black. See my picture below for burns from all that testing. The reason is that the arcs enter a small spot and all that energy through a single spot makes a localized hot spot burning the skin. Another reason is that the skin is made of dead non-conductive cells. So when the arcs pass through such high resistance layer, they create a lot of heat and burn it. As soon as electricity reaches conductive tissues, it disperses around to larger surfaces that generate much less heat.
- But why doesn’t it hurt when I hold a metal in my hand and touch the arcs with it? Because the metal provides a greater surface to my hand and rather than a spot, there is a bigger area for electrons to move into my hand. So the heat dissipates on a bigger surface rather than a spot and doesn’t burn anymore. Also when I hold the metal, I put a pressure which makes the non-conductive skin thinner and less resistive. But if I touch the same metal at a single point with not much pressure, it burns my skin.
- Why do the arcs jump to a floating metal object like my screw driver? Simple! It is not like they jump to the screw driver to jump somewhere else. Screw driver is like another plate of a capacitor, which has a tiny bucket of charges in it. So what the coil does is that it sucks out and pushes back in that tiny amount of charge away/to the screw driver.
- Even when the arcs are not jumping to the screw driver it zaps my finger. Screw driver, just being close enough to the coil, peaks up electric fields, like another plate of a capacitor. Those fields are so strong that they can suck/push charges from my finger.
- I love the audio I created. I showed you two tuning of the circuit, one that sounded nice and smooth, and the other which sounded saturated and jumpy. For the smooth one, you have to raise the PWM to around 50% and reduce the audio gain to prevent any saturation of PWM signal. For the saturated one, you have to lower the PWM so much that arcs don’t jump. But then raise the gain so much that the PWM level can jump to 50% or 60% or more. That way the low level audio doesn’t pop out, but usually the bass which is a higher pop pushes a high PWM and causes the arcs to jump. And the arcs created this way can jump further too.
- The popping arcs from my saturated audio jump much further and sharper than the fuzzy arcs of the smooth flow. I believe the reason is that when the arcs are continuous and consistent in level, the air all around the pin is ionized and the energy flows in every direction continuously like you see. This makes the arcs shorter too as they are not focused anymore. But when they pop out in single bursts, the air has time to create only one ionized channel and all energy flows through there. So it jumps further.
Now if you wonder how my skin looks like after so much burning, here it is. All those burns were surface deep and the black burns could be washed away, although they left small blisters here and there, because, well, they were hot! Don’t burn yourselves! and DO YOU REALLY KNOW HOW I GOT THOSE BURNS?!
You may thing I got them from touching the coil. Half of them maybe, but the other half was from touching metals around me, or turning the damn camera on/off! Every time I tried to touch something while the coil was running, it would burn me. Just sitting close to the coil, my body would peak up enough energy to zap any metal I touched, same as touching the screw driver in the video. Almost ten times I forgot to turn the coil off, while tried to turn the camera off and saw smoke coming from my hand and camera. Fortunately the camera was not damaged.
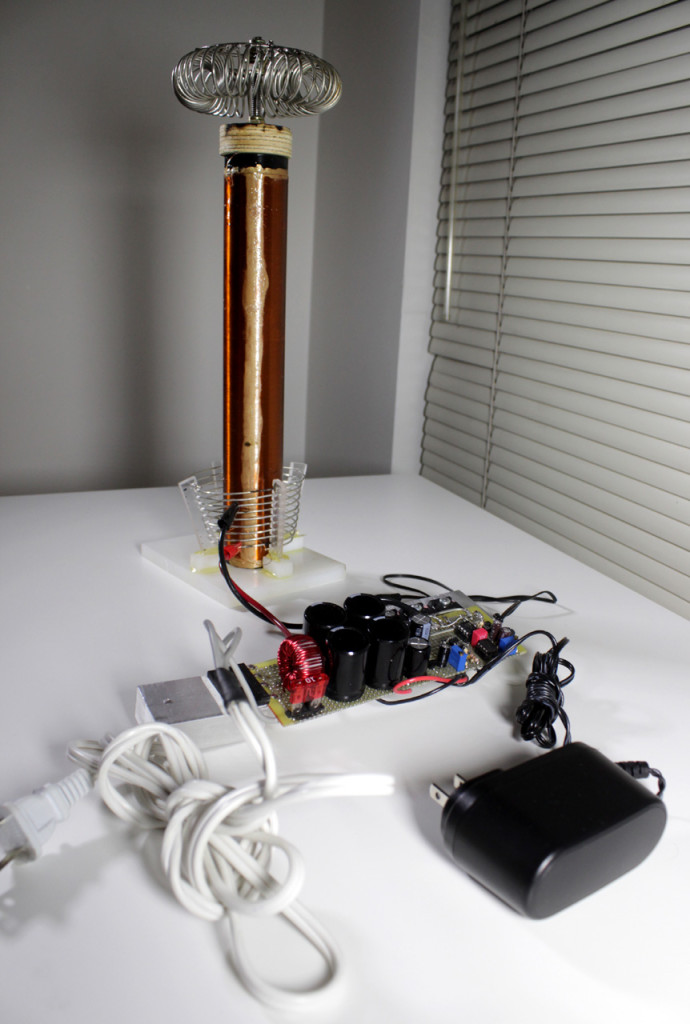
And more shots of my beautiful coil:

