This circuit is made as a part of my video in which I wanted to make a wireless lavalier microphone:
Well that wireless thing didn’t work as I expected, but at least I could make the microphone work!
Condenser microphones need to be powered, because they act like a variable impedance (usually capacitance). To capture a changing impedance, the easiest way is to run some current through it (usually using a series pull up resistor) and then capture the changing voltage when the impedance changes.
Of course the voltage signal directly from the microphone is not very large and usually requires amplification. And that’s why I designed the following two different amplifier circuits:

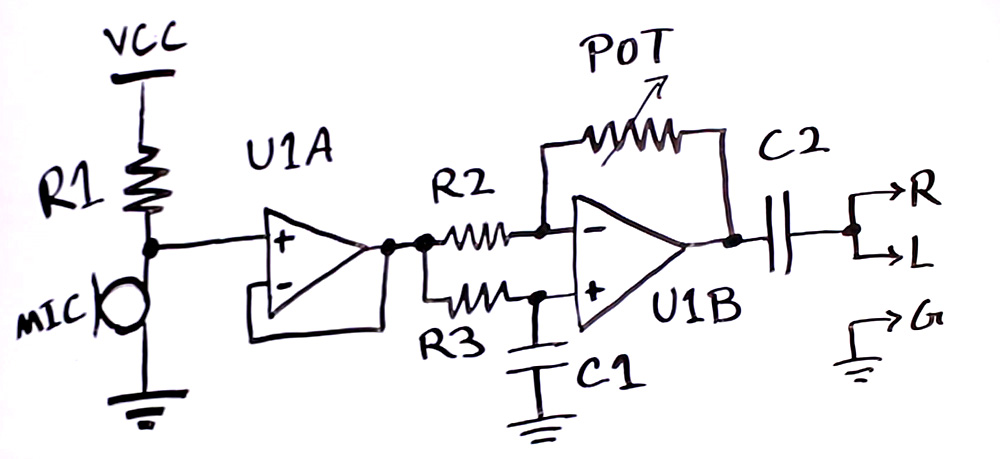
Figure 1: Amplifier with Buffer
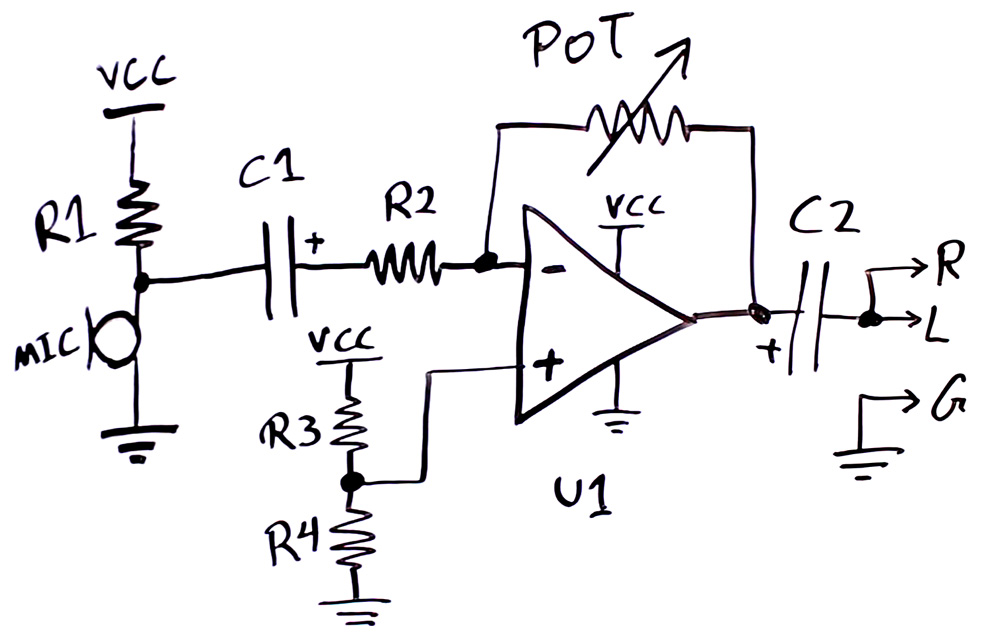
 Figure 2: Amplifier without Buffer
In both circuits I used TLV4112 operational amplifier which has two OpAmps and a rail to rail output for maximum voltage swing, and works down to 2.5V supply so I can run it using two AA batteries or VCC = 3V.
In Figure 1, the signal from microphone goes through a buffer (U1A) first which prevents loading the microphone signal, and then goes through U1B amplifier circuit. Since the microphone signal is riding on a DC voltage, the same voltage is filtered through RC filter R3 and C1 and provided as reference for U1B amplifier. The gain of the amplifier if equal to Vo/Vi = -(pot/R2) . So changing potentiometer value would adjust the gain.
The output of the amplifier also rides on the same DC voltage level as microphone signal. To pass the signal to a microphone input jack this DC voltage should be removed as done by C2 capacitor.
The downside of this circuit is that because a buffer is used, and every amplifier has some internal noise, that noise is added to the signal and is amplified. But in return the microphone signal level is not affected by the gain stage loading it.
The component values for this circuit are:
- R1 = 6.8k
- R2 = 1K
- R3 = 100K
- POT = 100K
- C1 = C2 = 10uF
Figure 2 amplifier works very much the same as the first design. Except that the amplifier has a separate reference voltage made by R3 and R4, and there is no buffer.
Due to the lack of buffer, the signal from the microphone is loaded to a smaller level which is then amplified. But it can be less noisy as the buffer is removed. The component values are:
- R1 = 6.8K
- R2, R3, R4 = 1K
- POT = 100K
- C1, C2 = 10uF
Other Considerations:
In general human ear is very sensitive to noise and can hear it easily and it is hard to completely get rid of noise. Amplifiers have a lot of internal components that add to the noise level. So selecting a very good low noise amplifier is crucial for a high performance circuit. Make sure to check the datasheet and pick a low noise OpAmp.
For small signals, it can be beneficial to amplify the signal with a single class A transistor circuit like THIS to a decent level and then amplify further with an OpAmp. A single transistor poses less noise on the signal. But the gain should be kept small, because a high voltage output also results in larger distortion.
Doing all amplification through low noise discrete circuit can also be a good solution. But I like OpAmps, they keep the design simple!
It is important that the power supply of the circuit is very clean. So using proper filtering on the supply to isolate this circuit from noisy circuit and sources is recommended. Especially if the circuit is placed close to RF transmitter circuits that can also radiate to the analog circuit. In such case, you might like to sprinkle more capacitors here and there!
