Turns out it is quite easy to make a taser, here’s how:
Well, again don’t zap anyone with this. You can make other useful devices with this design such as ignitor, a noisy-sparky-dim-inefficient light bulb, scary Halloween costume, or whatever you can imagine! Just don’t hurt each other.
So like mentioned in the video you can use a transformer to create very high voltage. Creating very high voltage without a transformer can be very hard, because you would need very high voltage rated components on the output (>10000V), while with a transformer you can pick lower voltage rating components on the low voltage side and let the transformer take care of creating the high voltage. But how does a transformer work?
I make it simple here: a typical transformer is made of two wire windings around the same core (air, metal, ferrite, etc.). When you apply AC voltage on one side, you create magnetic field which passes through both windings. Now changes in magnetic field will move electrons on the secondary and hence create current flow. You need change in magnetic field to move electrons back and forth, and so transformers only work with alternating signals. They don’t need to be sine wave, but changing in general.
Now in an ideal transformer the output to input voltage ratio is equal to output winding to input winding number of turns, like I showed in the picture below (60 if for my specific transformer).
On the other hand, the output to input current ratio it proportional to input winding number of turns to the output, which is backwards the voltage ratio. As you know power is voltage times current and if you combine these together you will realize that in an ideal transformer (100% efficient) the input power is equal to output power. Of course in real life there are many losses that will reduce the efficiency such as core losses in form of heat, wire resistive losses, etc…
Like shown in the figure above in a car ignition coil one side of the primary and secondary windings is tied together, which doesn’t change the behavior of the transformer. It reduces the number of connections to the coil, but also eliminates the primary to secondary isolation that is not needed here, but is critical in many other applications such as isolated power converters.
So like a regular transformer, if I put 10VAC on the primary of this specific transformer with 60:1 secondary to primary winding ratio, I will get close to 600VAC. But for a taser I need over 10000V on the output and that’s why I use a useful behavior of the inductor.
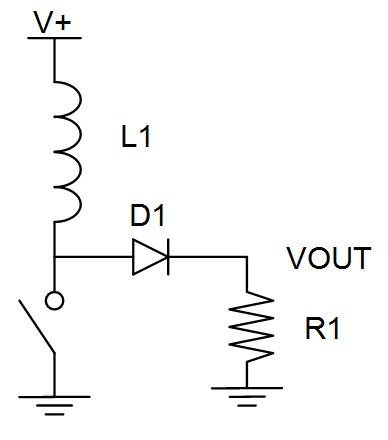
Unlike a capacitor that tried as hard as it can to keep the voltage across if as stable as possible by sourcing and sinking surges of current, the inductor tries to keep its current stable as much as it can, by surging the voltage across it. So if you charge it to a certain current, it tries to not allow or slowly change the current. What does that do for us? Take a look at the circuit below. At the beginning the current through the inductor L1 is zero. When we close the switch, the inductor slowly allows the current to rise through V+ supply. Say it rises to 1A and then we open the switch. But the inductor wants to continue driving 1A current. So what happens is that it pushed the current through D1, which was off up to this point and turns it on, and the current runs through R1 resistor. Now let’s say R1 is 1kOhm. So 1A x 1k = 1000V is generated across the resistor in form of a spike that dissipates quickly. So just that easily, we created 1kV spike. This means that the voltage across the inductor on the diode side jumped close to 1000V, all in order to continue outputting 1A. This circuit is the basic concept behind the voltage booster circuits. Just be aware that if you generate huge voltages, all your components such as the inductor, switch, diode and resistor should be able to handle and not break under such voltages.
Now the primary of the transformer is the same as an inductor, it has self inductance. If we charge it and let go like I mentioned, the voltage would spike up and that converts to even higher voltage on the secondary. My specific car ignition coil has a 0.7Ohm primary winding resistance. So if I put 12V across it, I would have 17A through hit. That is beyond my supply and battery limit and so pulls their voltages down to a lower level which is still OK. For example with the power supply, I can’t run more than 10A.
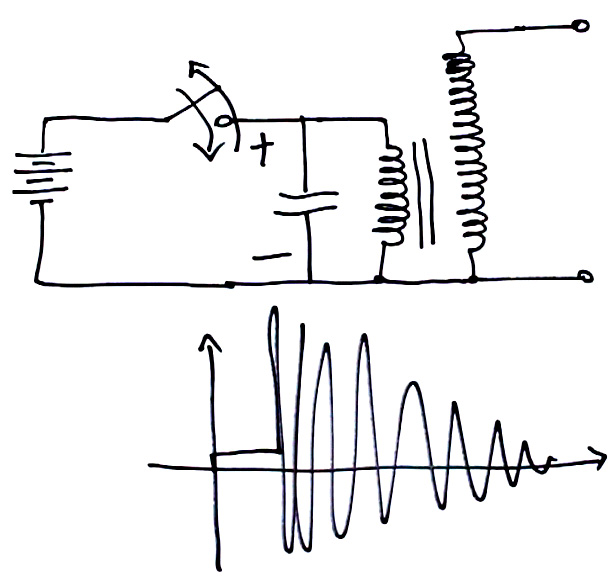
When I disconnect the supply, I see spark on the primary too because the 10A current tries to keep going and creates a high voltage arc, but also the secondary voltage rises and makes an arc, especially when I add the capacitor. So like I showed in figure below, the self inductance of primary and the added capacitor are charged together when switch closes, and then start oscillating when switch opens, creating a high voltage oscillating waveform.
 The reason for oscillation is that when the switch opens, the inductor wants to continue giving out current, the same direction that capacitor wants to discharge its current. So the current of the inductor keeps flowing happily until the capacitor completely pours its charge into the inductor. So the inductor has energy to continue and it starts charging the capacitor in the opposite polarity and charges it all the way up to a negative high voltage until it doesn’t have any more energy to give. But now the capacitor is fully charged and starts depleting it energy into the inductor running current in the opposite direction. This oscillating cycle would continue for ever if it wasn’t for the losses in the circuit such as resistances that would cause the voltage level to drop.
Also this oscillation creates even higher voltage on the secondary that as we saw creates very high voltage sparks. From the gap the sparks were arcing over, I would say their voltage was over 20,000V.
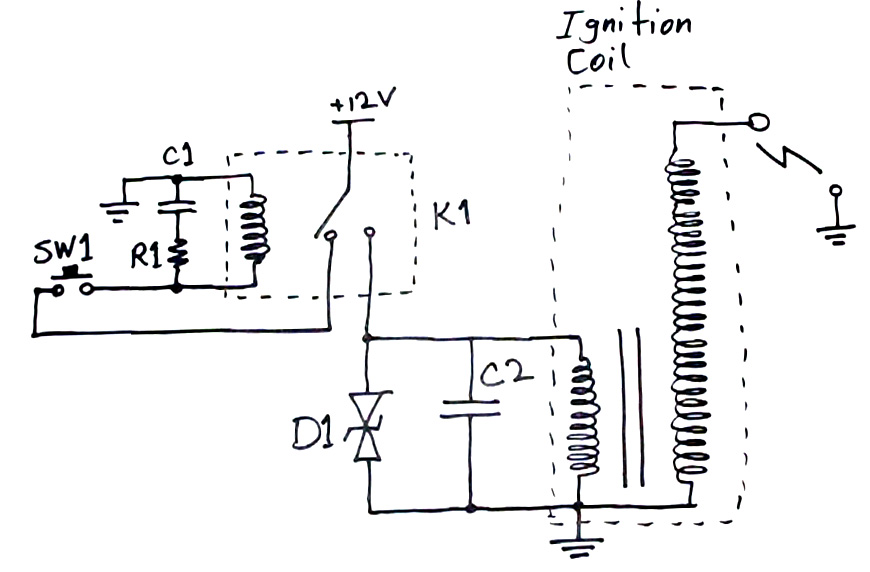
And so I created the circuit below to create a continuously arcing circuit. The way I designed this circuit, when you press SW1, you actually connect 12V across the relay coil through the relay normally closed contact. This will cause the relay to switch away, which removes the voltage across its coil and turns it off, and so relay returns to normally closed position, and hence relay will oscillate. The capacitor and resistor across the relay coil are to slow down the relay switching frequency. This is to allow the 12V to be across the transformer primary for a longer time so that it charges high enough. And when the relay switches away, we have a spark on the output. There will be sparks like a taser as long as we hold the switch.
 I chose C2 capacitors as 250V rating to make sure they won’t break easily, and also diode D1 clamps the primary voltage around 350V. C2 is made of 10x 1uF capacitors in parallel. Here’s a list of my components:
- SW1: regular push button
- C1: 22uF >16V aluminum capacitor (mind the polarity)
- R1: 4.7 Ohm (current limiting and timing)
- K1 relay: Omron G8QN-1C4 DC12
- D1 TVS: LittelFuse SMAJ350CA
- C2: 10x 1uF 250V ceramic capacitors in parallel
- Transformer: car ignition coil, get it from any car auto part shop
This is not the most awesome circuit, but maybe it is the easiest one to make. There are things to consider here:
- When the relay disconnects, the transformer creates strong sparks on primary too to get rid of its charge. Those sparks can eventually hurt the relay by welding the relay contacts together. That kept happening to my relay too and I had to kick it to disconnect the relay contacts.
- D1 rating I used was above C2 rating, which is not the best thing to do. I couldn’t find small size, large value but high voltage capacitors so I had to go with 250V. At the same time I wanted higher voltage on primary to create bigger sparks. So D1 rating was at 350V. My capacitors didn’t break. But going like this would reduce their lifetime.
- This circuit can also be designed with silicon parts like transistors (IGBT or MOSFET) but it would need more circuit, like an oscillator and driver which would make the circuit more complicated. I like simple and quick, sometimes!
Make sure you don’t get zapped and make your own.

