Want to make a reliable night light for your nights behind enemy lines? Look no further!
But first I have to thank Circuit Specialists for providing me with some magnificent tools I was craving for. Make sure to visit them for the equipment you need and use the promotion code “ElectroBOOM” for an additional 5% discount till the end of February 2016.
What I think every electronics lab should have are these two:
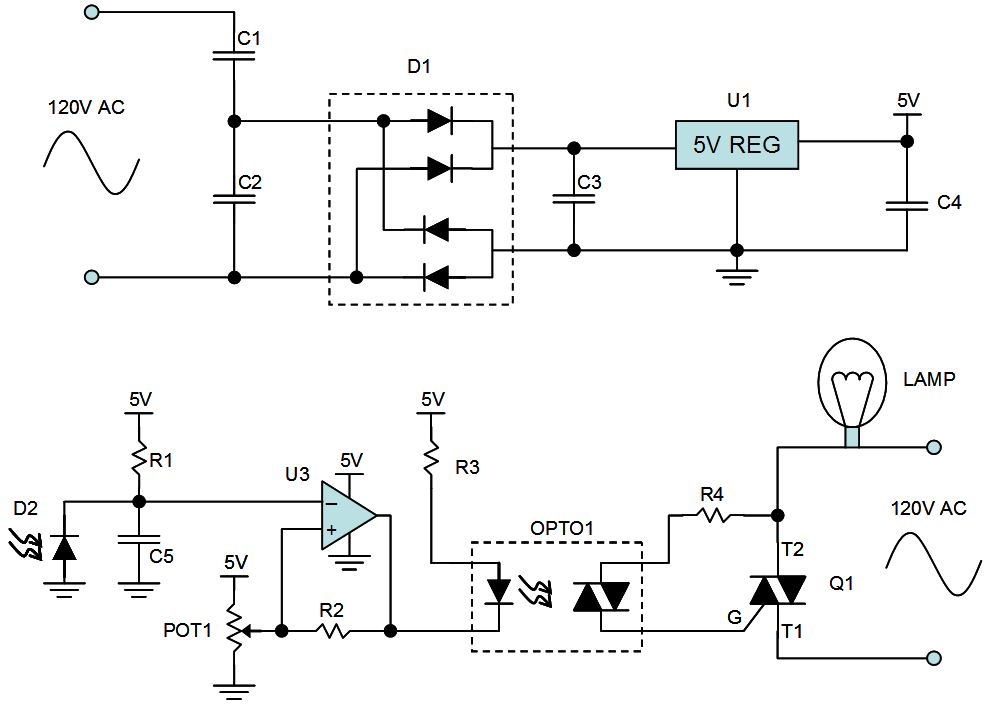
Well, like I said this circuit is a bit of an overkill but it is a good educational piece never the less. Below is the schematic of the circuit.
There are three parts to the circuit which I explain:
- The power supply circuit
- The sensor circuit and,
- The power switch circuit
Power Supply Circuit
You need to provide a low and stable voltage for your control circuit to run on and for that you need a low DC voltage. 5V is not a bad level to choose, although this circuit doesn’t necessarily need 5V and can run on more. To create the 5V you need to step down and rectify the 120VAC from the power line.
To step the 120VAC down I am using a capacitor divider circuit, which is made of C1 (470nF) and C2 (2.2uF). It works the same as a resistor divider but works for AC signals only. The benefit of such divider is that it doesn’t waste power in form of heat, like a transformer but with capacitors. C2 being the larger value would create a smaller impedance and so a smaller voltage across it. The AC output of this circuit would be Vin x (C1/(C1+C2)) or around 21VAC. But this is if this divider is not loaded at all. But since this circuit provides power to the control circuit the voltage across C2 drops much more bringing it to even a safer level for the circuit.
So as I measured in the video, with all the circuit together, the rectifier output is between 7V to 13.5V.
The AC from C2 goes through D1 which is a bridge rectifier and is rectified to DC having C3 (100uF) at its output.The bridge is a full wave rectifier which results in smaller output ripples. But you could also make a simpler rectifier using two diodes as half wave rectifier.
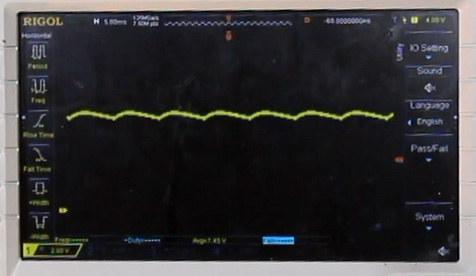
Now you might ask, since C3 is so large, how come it doesn’t effect the divider so much. Well it does at the beginning when it is charging. But as it charges up, the rectifier starts to isolate it from the divider and so it slowly gets out of the picture and only draws from the input when it needs to be charged again, which is every cycle of AC. The reason is that while AC is oscillating between high and low, at some level all diodes turn off and only C3 provides current to the circuit and hence the ripples across C3 as shown below.
The rising side of the ripple is due to when the input voltage is rising close to the peak charging the capacitor, and the falling side is when the input wave is too low and so C3 is isolated from input and provides power to the circuit and discharges.
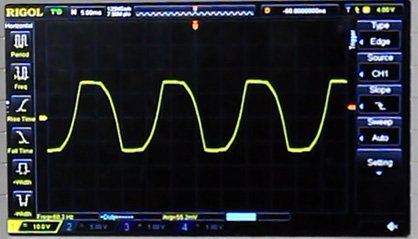
When C3 is being charged by the input, it draws much current which added to the normal draw of the control circuit results is loading of the capacitive divider. This loading shows as flat peaks at the divider across C2 as shown below.
The output voltage of the rectifier significantly changes by the amount of loading from the circuit. So you need to know what your maximum and minimum voltage would be based on loading and ensure it doesn’t rise too far to blow circuits, or too low that the circuits shut down. To prevent over voltage across C2, you can place a bi-directional TVS or zener diode across C2 which would clamp the voltage across C2 below a suitable level. But that would waste power as heat. So it is better if the diode won’t conduct under normal operation and is only for over voltage protection.
So now voltage across C3 is fed into a 5V regulator that provide a nice and fixed output voltage isolating the input fluctuations.
Sensor Circuit
I am using a photo sensor. It is a type of diode, which is kind of like a variable resistor that changes resistance based on the amount of light, or another way to look at it is a current source that changes its current based on light. More light results in more current.
This diode needs to be reverse biased. It is placed series with R1 (1M Ohm) resistor between the supply. So the voltage between them rises and falls depending on the amount of light. Capacitor C5 reduces the reaction time of the sensor to the light changes and fluctuations. Because this sensor is very fast reacting and can even see the flickers in light coming from 60Hz city power lines and could effect the output. I also made it specially slow (C5 = 470nF) so that we can see the light blinking in the video as the light feeds back into the sensor. But you can choose a smaller capacitance like 100nF.
The sensor output is fed into a comparator circuit with a positive feedback. This circuit is a Schmitt Trigger comparator that has hysteresis. This means the output switches high when input falls below V1 voltage but switches low when input rises above V2 level. The reason for two levels is the positive feedback from comparator output via R2 (390k Ohm) that results in a different voltage at positive input of the comparator depending on the output state. Adjusting the potentiometer POT1 (100k Ohm) changes these levels up and down, so you can adjust the circuit trigger level based on the desired environment light.
Also hysteresis is generally beneficial to prevent noise changing output quickly. If there was only one threshold and the signal was sitting on the threshold with some noise, the output would switch quickly. But with two thresholds spread apart it is much harder for the noise to false trigger the circuit.
Power Switch Circuit
There are different ways to switch the power. The important thing is that you don’t necessarily want to mix the AC line to your control lines depending on the circuit you have. For this circuit, you can’t mix them for sure as the power lines are already not directly connected to control circuit and pass through the rectifier diode.
You could use different ways to provide isolation between power lines: use relays, or use opto-isolators.
A relay is not a bad idea but the problem is that the relay coil generally draws large amounts of current that pulls the supply across C3 way down shutting down the circuits. Opto-isolators are good for providing insulation because with small amounts of current (<5mA) their outputs can switch.
But what is this part I’m using? You need to understand a component called TRIAC. It is a bidirectional part where when it is on, it can let current through both ways and when it is off, it blocks both ways. So It is ideal for an AC signal.
The opto-TRIAC turns on when the internal LED turns on. The regular TRIAC (Q1) turns on when the voltage between gate-T1 terminals is the same direction as T2-T1 voltage and the current running through the gate is greater than a threshold. (hope that makes sense!)
When the TRIAC is turned on, it remains on as long as the current running between its terminals (T1 and T2) is above zero (for exact level you should see the datasheet). So even if the gate current is turned off, the TRIAC only turns off again if the current through it drops significantly.
Now with this circuit I put together, if OPTO1 is off, there is no gate current through Q1 and it is off. But if OPTO1 is on, as the AC line oscillates, the gate current through R4 turns Q1 on and with it the light.
Now, to turn the opto on, we need around 5mA through the LED for reliable trigger, and that current is what causing the rectifier output to drop from 13.5V to 7V.
I pass the circuit to one of my Patreon patrons. You could win such MAGNIFICENT goodies too if you support me, and make my projects easier too. Thanks!
 And here’s the bill of material for my circuit:
- C1: 0.47uF 250V (non-polarized)
- C2: 2.2uF 25V (non-polarized)
- C3: 100uF 16V
- C4: 10uF 16V
- C5: 0.47uF >10V
- D1: DF02M (Diode Bridge)
- D2: PD204-6C (Photo Diode)
- Opto1: MOC3023 (Opto-TRIAC)
- POT1: 100k Ohm single turn
- Q1: BT136-600D,127 (TRIAC)
- R1: 1M Ohm
- R2: 390k Ohm
- R3, R4: 820 Ohm
- U1: UA78L05CLP (5V regulator)
- U3: MCP6542-E/P (Comparator)


