Who knew a vibrator could cause levitation? Here’s the proof:
It’s quite amazing the sight of the levitating water. The problem is that it is the camera that records the water like this and it is not visible to a human eye.
The flow of water has a randomness to it, but vibrating with a uniform wave will give it a very predictable shape. If the flow of the falling water is vibrated at the same frame rate as the camera, then you will see the water levitating. But how is that?
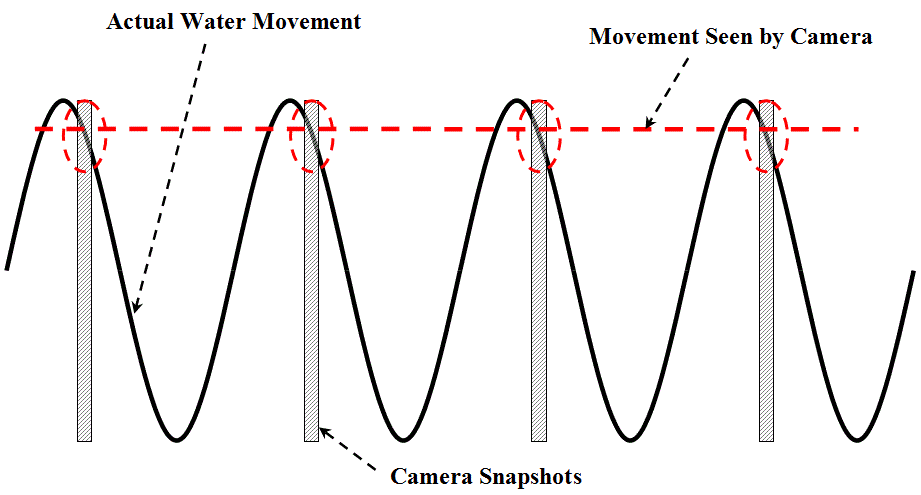
Let’s take a point at a certain distance away from the water nozzle. the water in that spot moves back and forth, for example in a shape shown in the figure below. The camera which is running at a frame rate exactly the same frequency as the water vibration, will take shots in a time shown as shaded areas.
You can see that the water position captured by the camera is the same in every frame. And this is the reason for the illusion of water being stand still in mid air. Because the video would show the water in the same spot, although in reality it is actually moving back and forth.
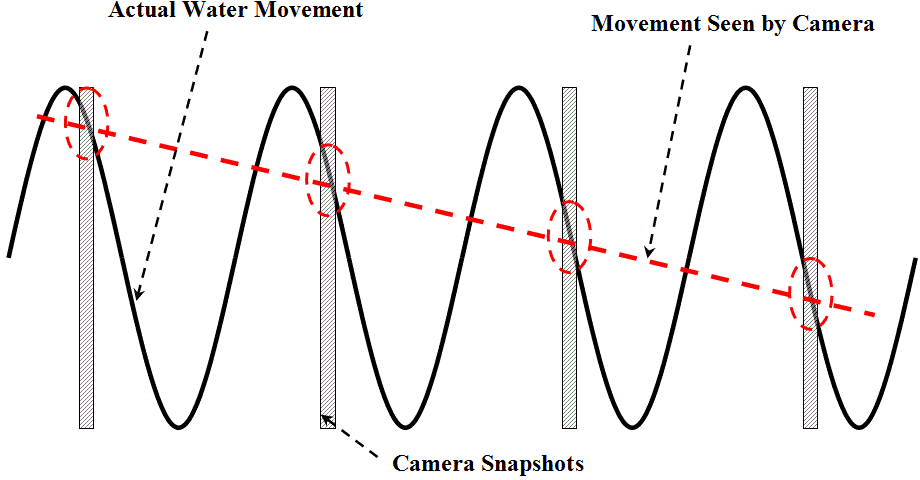
If the frequency of vibration is slightly different from the camera frame rate, the following happens:
You see that the position of the water changes slowly in every frame. This is the reason of the slow forward or backward motion of the water. The motion speed is dictated by the difference between the vibration frequency and the frame rate. The larger difference means a faster speed. Also a higher frequency than the camera rate means moving forward, and a lower frequency means moving backward.
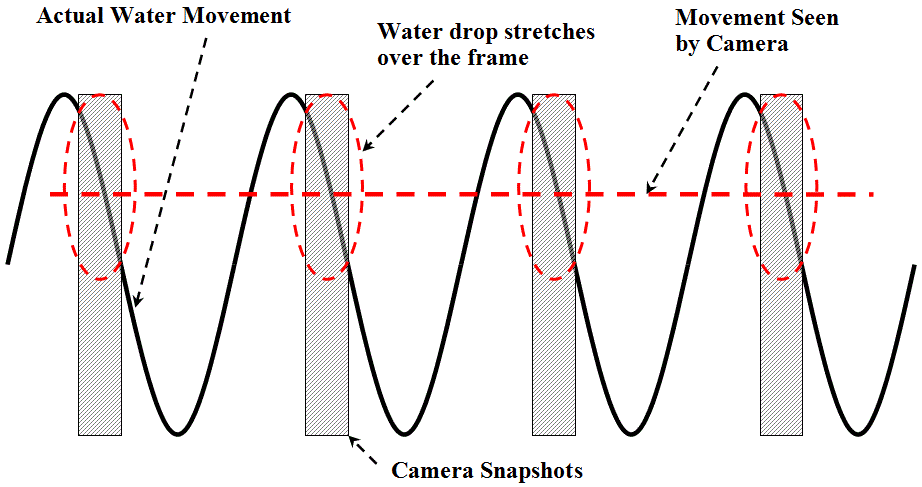
As I mentioned in the video, there is an important factor in taking such a shot, that is the camera needs to take very fast and short shots every frame. Something faster that 1/500th of a second for the aperture speed gives good results. But as the water speeds up falling down, it may become blurry again and demand for a faster aperture speed. This also means that you must have lots of light to make your video properly lighted and bright, and otherwise the scene will be dark.
The figure below shows how a long aperture speed creates blurriness. The shaded area which is the time it takes for the camera to take a frame is too long and the water travels quite far within that area. So instead of one sharp droplet, you will end up with a water smudge on the screen.
There are other tricks you can do with the same concept. For example:
- You will also get frozen-in-time effect having a vibration speed that is a multiple of the frame rate, like 60Hz or 90hz. The wave length of the water will be shorter.
- You can double your frame rate to 60 frames per second with vibration frequency of 30Hz (or 30 FPS for 15Hz also will do the same). This way the camera takes two shots of the same vibration period each 180 degrees out of phase. So it will look like two waves of water on top of each other. Also if there are distinct droplets in the flow, if you change the frequency, it will look as if two droplets are moving back and forth at the same spot, going up or down depending on the vibration frequency.
This is quite a nice scene created by this effect. Like I mentioned, I have two more videos to cover about this subject. One is about how to drive the speaker, and the second is a mind blowing surprise, at least for me! So stay tuned and thanks for watching.


